Read Before Submitting Your Songs

Your files need to be organized in a specific way before uploading. Submissions that do not follow this structure are rejected automatically. This is not manual review, it is an automated system. Two minutes here saves you a failed upload and a restart from scratch.

01

Export Your Stems from Your DAW

Before you can submit anything, you need individual stem files exported from your recording software. Do not send your DAW project files (.rpp, .als, .ptx, .logic, etc.) - we cannot open them. Export every track or bus as a separate audio file.

Stem files must be WAV. Export your tracks as WAV at 44.1 kHz or 48 kHz, 16-bit or 24-bit. Do not convert, resample or compress them before sending.

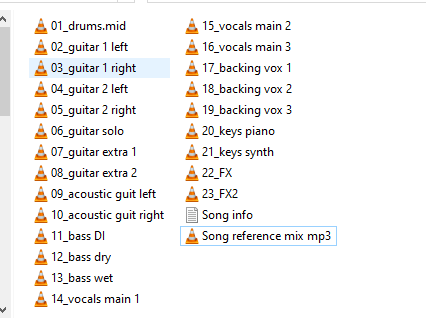
What to export: Each instrument or instrument group as its own file. Kick drum, snare, overheads, guitars left and right, bass, lead vocals, backing vocals, keys - each gets its own WAV file. Do not bounce everything into a stereo mix. We need the individual pieces to build the mix.

💡 You can include reference mixes, rough mixes or any other supporting files in your archive in any format (MP3, FLAC, etc.). These are uploaded alongside your stems for context and do not need to be WAV.
💡 If your drums are recorded, export each microphone as a separate file. If they are programmed, export at minimum kick, snare and cymbals as separate files. The more separated, the more control we have.
Image Placeholder - DAW export dialog example
02

Organize Your Folder Structure

How you structure your files inside the archive tells the system what it is looking at. Follow the layout for your submission type exactly.

For a Single Song

Create one folder named after your track. Place all your stem files inside it. Subfolders are optional - you can organize by instrument group or keep everything flat. A notes or info text file and any reference mixes can go in the same folder. Here is a real example:

Example of stem files inside a single song folder in Windows Explorer
A real single-song folder - numbered stems, a notes text file, and a reference mix alongside the WAV files.
For an EP, Album or Multiple Songs

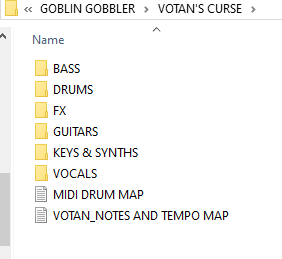
Create one main folder named after your project. Inside it, create one subfolder per song, named after each track. Each song subfolder follows the same structure as a single. Here is a real example:

Example of an album project folder with one subfolder per song in Windows Explorer
A real album folder - each instrument group has its own subfolder, plus a MIDI drum map and notes file at the top level of the song folder.
For album or EP submissions, do not place audio files directly in the root of the archive. Audio files must be inside a song subfolder. A root-level audio file will cause the entire submission to be rejected before any files are uploaded.
03

Add a Song Info File - Recommended

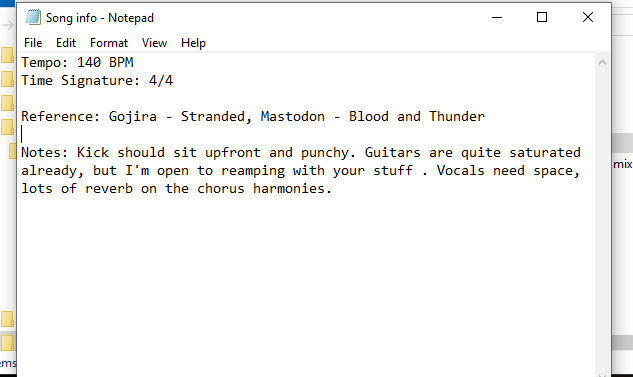
Inside each song folder, you can include a plain text file (.txt) with basic project information. This is not required, but it helps us set up the session accurately, especially for tempo and time signature, which affect how the session is structured in our system.

You can write it however you like. Plain sentences are fine. The system reads it and extracts what it needs.

A plain text song info file open in Notepad showing tempo, time signature, references and mixing notes
A real song info file - plain text, no special format needed. Just write what is relevant and the system will read it.
💡 For albums and EPs, place one info file in each song subfolder. Each song can have completely different notes. The system reads them separately.
Image Placeholder -Song info file example (text editor screenshot)
04

Compress Into a Single Archive

Once your folder is ready, compress it into a single .zip or .rar file. Only these two formats are accepted. Do not submit 7z, tar, gz, or any other format.

The archive should contain your project folder at the top level, not the individual files themselves. You are compressing the folder, not its contents.

Windows
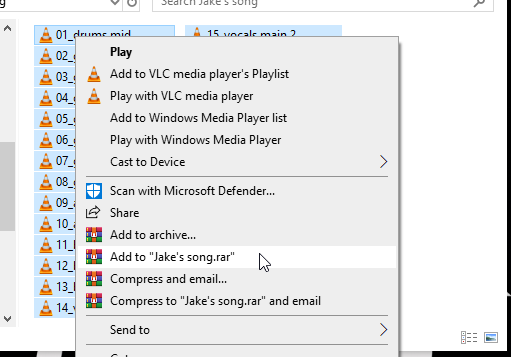
  1. Right-click your project folder in File Explorer
  2. On Windows 11: select Compress to ZIP file
  3. On Windows 10: select Send to, then Compressed (zipped) folder
  4. For RAR: install WinRAR or 7-Zip, then right-click and choose Add to archive
macOS
  1. Right-click (or Control-click) your project folder in Finder
  2. Select Compress, followed by the folder name
  3. A .zip file is created in the same location - that is your archive
  4. For RAR: install The Unarchiver or Archiver
Right-click context menu in Windows showing Add to archive option using WinRAR
Right-clicking your project folder in Windows with WinRAR installed. Choose "Add to archive..." for full options, or the quick shortcut to create a RAR directly.
Archive Size Limits
Single Song 5 GB
EP, Album or Multiple Songs 15 GB
💡 Large files take time to upload. On a slower home connection, a 10 GB archive can take well over an hour. Plan accordingly and do not close the upload tab while it is running. The page will close itself automatically when your files have been received.
05

Fill In the Form and Send

Your archive is ready. Fill in the submission form below. Once submitted, you will receive a unique upload link by email. Use it to send your archive directly to us.

The upload link is valid for 48 hours. Upload your archive as soon as you receive it.

The upload link is single-use and tied to your submission. Do not share it. If your link expires before you upload, contact us directly.
Go to the Form Below ↓

Submit Your Project

Fill in the details below and we will be in touch to get your project moving. Fields marked with * are required.

30 characters remaining
60 characters remaining
Submission received. We will be in touch soon.